
Buy One Get Bundle
The "Buy One Get Bundle" promotion allows customers to purchase a specified product and receive another product or a bundle of products at a discounted price.
TIP
This discount type is currently available only on the Genstore platform.
Access your dashboard
- Log in to your store admin panel
- Navigate to: Apps -> Markivo Discount & Upsell -> Product Discount -> Buy One Get Bundle -> Create
Set up your campaign
Configure the following on the Create page under the Rules tab:
Campaign details
Name Your Campaign: Choose a unique name that shoppers will see, such as "Buy One Get One Free." Keep it concise—no more than 30 characters and without leading or trailing spaces.
Timing your promotion
Set the Dates: Input the start date and time, such as 20241101 at 12:00 AM. Only the start date is mandatory. If no end date is set, the promotion runs indefinitely. Note that the timezone is locked.
Discount rules
- Customer buys (X): This is the trigger condition for the current discount rule. You can select one or more products, indicating that customers who purchase any of these products will be eligible for additional discounts.
- Customer gets (Y): Discount details, you can further specify:
- Maximum value: The maximum number of this item that can be purchased at the discounted price. Set to 1 if only the first item qualifies for the discount, and any additional items will be charged at the original price.
- Default value: Automatically pre-fills the quantity in the shopping cart. Setting a value greater than 0 can encourage customers to purchase more.
If you want to enforce a bundled purchase, please use the Combo Bundle discount.
Discount
- Quantity requirement: Set the maximum number of additional discount products a customer can receive.
- Discount type: Choose from percentage discount, fixed amount deduction per product, or free.
- Value: Input the specific discount amount or percentage. For example, setting to 20% means a 20% discount, and setting to $5 means a fixed deduction of $5 per product.
Use cases
| Promotion Scenario | Customer Buys (X) | Customer Gets (Y) | Suggested Discount Effect |
|---|---|---|---|
| Classic BOGO | Select Item A | Select Item A, Quantity 1 | 100% Discount (Free) |
| Add-on Purchase | Select Item A | Select Item B, C, Quantity 1 | Fixed Amount Deduction (e.g., $5 off) |
| Cross-Category Upgrade | Select Products from a Specific Category | Select from Gift Pool, Quantity 2 | 50% Discount (Half Price) |
| Bundle & Accessory Deal | Select a Mobile Phone | Select Charger/Headphones, Quantity 1 | Percentage Discount (e.g., 20% OFF) |
Optimize campaign visibility and engagement
This section guides you through customizing settings to enhance the visual appeal and interactive elements of your promotions. Switch to the Content tab on the Create page:
Discount block
The product detail page integrates a discount module that clearly presents promotional details, enhancing customer engagement and purchase intent. This module provides extensive personalization options, including campaign name, display position, architecture button, and variant button (if advanced discount features are enabled), copy for each tier level, labels, badges, etc.
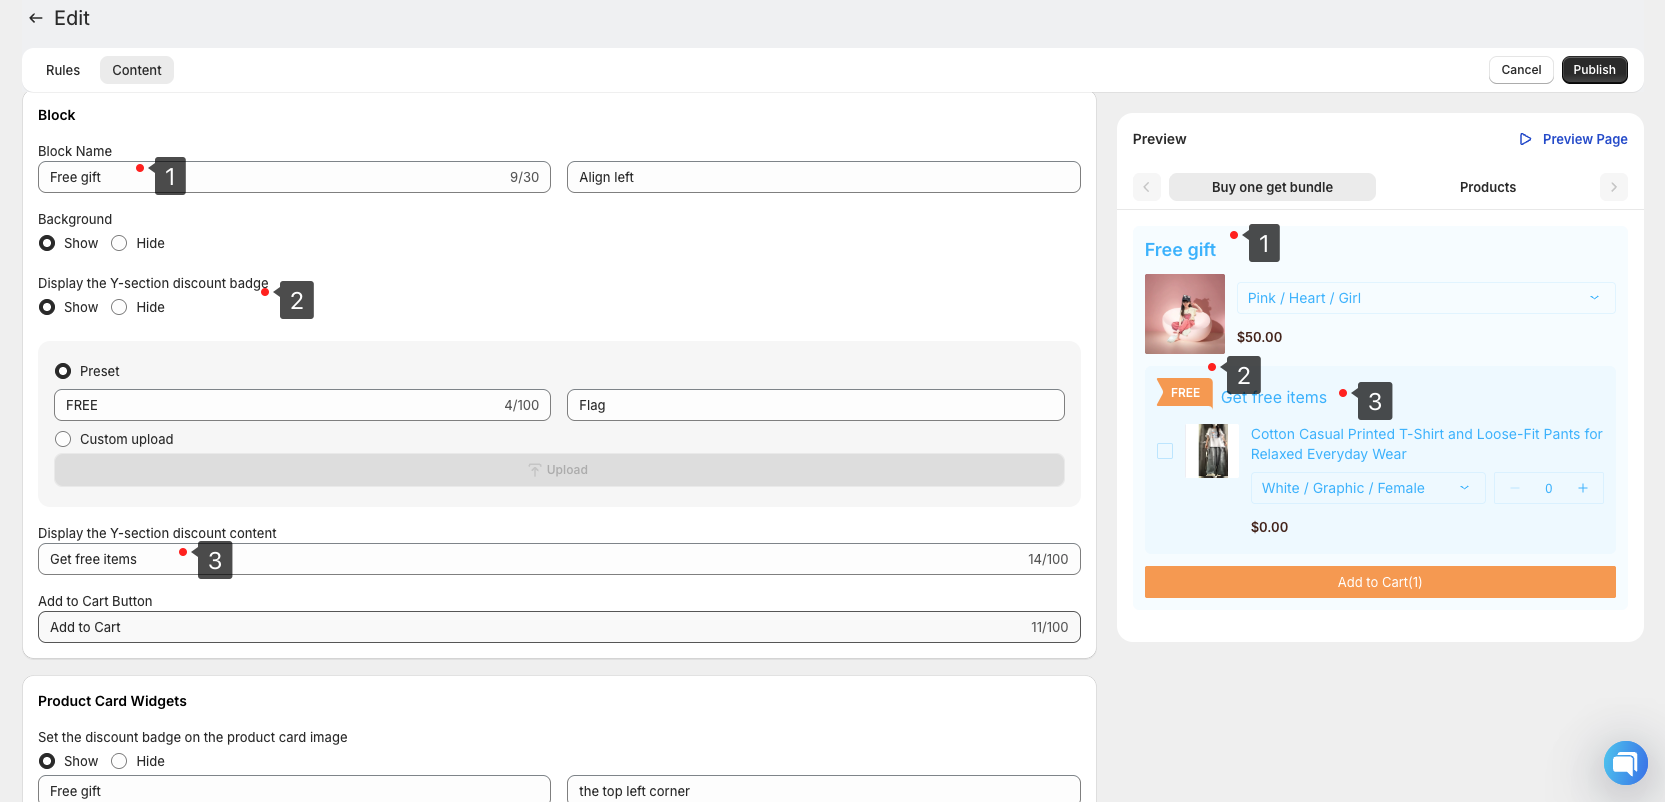
As shown in the image above:
- At Tag 1, you can modify the Block name to customize the title for your discount block.
- At Tag 2, you can modify the Y section discount badge to guide customers to select discounted products in this section.
- At Tag 3, you can modify the Y section discount copy to update the specific description of the discount.
Product card
You can add various promotional badges to product cards, such as at the four corners of the product preview image, below the price, or within the pricing area. Customize the copy to help consumers quickly identify and focus on promotional products.
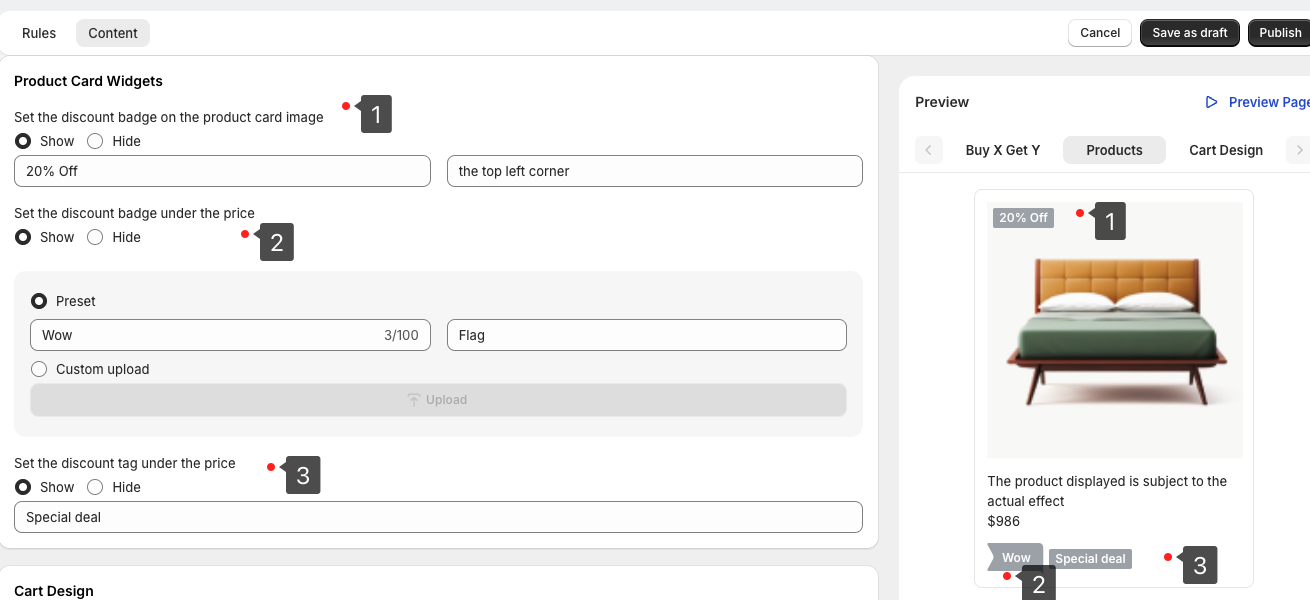
To stimulate consumption and guide customers to notice discount information, we recommend highlighting specific tags on discounted product cards in store search results. You can enable this feature in the product card widget settings and configure it accordingly to ensure customers can clearly see and understand the discount details.
- Tag 1: Used to set whether to display badges at the 4 corners of the product main image and define the badge content copy.
- Tag 2: Used to set the banner badge below the price. We provide customization of the banner copy, and you can also upload your own designed SVG image.
- Tag 3: Used to set the text badge below the product name. You can use simple language and slogans to describe the product.
TIP
To ensure discount information is clear and not cluttered, we recommend setting only one prominent tag on each product card.
Multilingual capabilities
Activate automatic translations to cater to a global audience, enhancing accessibility and market reach.
TIP
In addition, you can define the style according to your store's brand aesthetic, such as colors, text, spacing, and appearance. For details, please see Brand Customization.
Preview and publish
You can check the discount effect in the preview pane at any time. After confirming everything is correct, you can choose to Save as Draft or publish the campaign directly.
After the rule is published, it will appear in the Campaign list, where you can edit, copy, start, pause, or delete the rule. Additionally, we provide Data Analysis services, allowing you to further optimize rule settings based on sales performance data.